This article describes the process for uploading a Holter recording into the IQmark Centricity Interface software.
Step 1:
Open the IQmark Centricity Interface Application
Double-left click on the appropriately labeled 'Heart' icon located on the desktop.
.jpg?sfvrsn=e55b3449_0)
Step 2:
Search for and select a patient.
Specify patient search criteria within the 'Search By,' 'Search Location,' and 'Search For' fields.
.jpg?sfvrsn=f546ecdd_0)
Press the 'Search' button and double-left click on the desired patient within the 'Search Results' field.
.jpg?sfvrsn=50ea42cb_0)
Step 3:
Validate patient's information.
Check patient's weight, height, and race; update if necessary.
Patient's Race can only be updated within Centricity EMR.
.jpg?sfvrsn=2b5e0a71_0)
Step 4 (optional):
Select which medications to display on the patient's printed report.
Click on the 'Meds' button and place a check mark next to the desired medication.
NOTE: Selected items within the patient's history menu (accessed via 'History' button) do not apply for Holter reports


Step 5:
Specify the technician and ordering physician; then start the Holter test.
Use a selection within the 'Location' drop down menu to narrow down the selection of available names listed within the 'Technician' and 'Requested by' drop menus.
Specify the desired technician and ordering physician.
Select 'Holter' within the 'Test Type' drop down menu.
Click on the 'Start' button to display the 'Holter Analysis' menu.
.jpg?sfvrsn=723a7c28_0)
Step 6:
Enter in the start time and date of the Holter recording.
NOTE: Start Time must be entered in Military Time.

Step 7 (if applicable):
Turn on pacemaker analysis and configure any known specifications.
Place a check mark into the 'Pacemaker' check box and click on the 'Pacemaker Data' button to input any known specifications.
.jpg?sfvrsn=65888bd8_0)
Step 8 (optional):
Turn on and configure automatic printing.
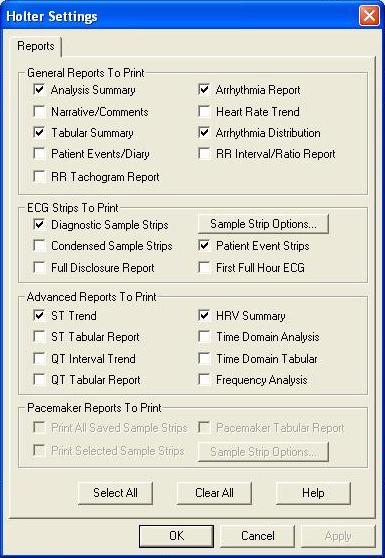
Place a check mark into the 'Print Reports After Analysis' check box and click on the 'Report Settings' button.
NOTE: The printout is generated after the recording has been acquired and analyzed.
NOTE: A printout can also be generated manually after the test has been completed.

Specify which sections are to be included on the printed report by placing a check mark in front of each desired selection.

Step 9 (optional):
Change analysis settings criteria.
Click on the 'Analysis Settings' button and make the desired changes. (i.e. SVE prematurity percentage, ST Segment Threshold, etc.)

Step 10 (optional):
Input information from patient's event diary.
Click on the 'Patient Diary' button.

Update each listed recorder event with information listed in the patient's event diary.
Manually input additional rows for events listed within the patient’s event diary that are missing from the list.
Click on the 'Save' and 'Close' buttons when data entry is completed.

Step 11:
Acquire and analyze the Holter recording from the CF flash card.
Verify that the 'Data Source' radio button is set to 'Flash Card.'
Click on the 'Acquire & Analyze' button.

If the recording contains signs of paced beats, the software will prompt the user if they would like to turn on pacemaker analysis, if it was not already enabled. When in doubt, the end user should always click on the 'Yes' button. Clicking on the 'No' button will discard all paced beat information after the recording is uploaded.

The 'Analysis Results' window will appear after the Holter recording is analyzed.
.jpg?sfvrsn=e32b3e4a_0)
Step 12:
Save the Holter report to Centricity EMR.
Click on the 'Exit' button to proceed with saving the Holter report.
A message prompt will come up inquiring if the ECG data file should be deleted.

Always click on the 'No' button unless certain no further editing of the Holter Full Disclosure is needed.
The Holter Summary report will come up after a selection is made regarding the ECG data file.

Click on the 'Exit' button and a final message prompt may come up inquiring if the Holter report should be imported into Centricity EMR.
.jpg?sfvrsn=1c037e6d_0)
Click on the 'Yes' button unless the Holter report was entered in error.
NOTE: This prompt can be disabled within the IQmark Centricity Interface Configuration Utility.