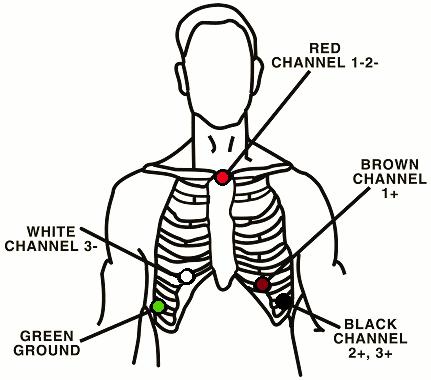
This article identifies the steps needed to prepare and hookup a patient for a Holter test.
Identify the electrode sites. Thoroughly shave all body hair from the electrode sites. (refer to the diagram below)

Rub skin with an abrasive pad or lint free gauze pad until the skin appears pink and dry.
Clean and rub the skin with an alcohol prep pad until a reddish tinge appears. Let each site dry naturally and thoroughly.
Snap the patient lead wires onto the electrodes.
Peel the protective backing off an electrode. Attach electrodes to the patient.
Gently set the gelled centers against the skin. Use care to avoid pressing gel out onto the adhesive. Smooth the electrode from the center to the outer edge. If the electrode wrinkles as it is being applied do not continue; replace the electrode with a new one.
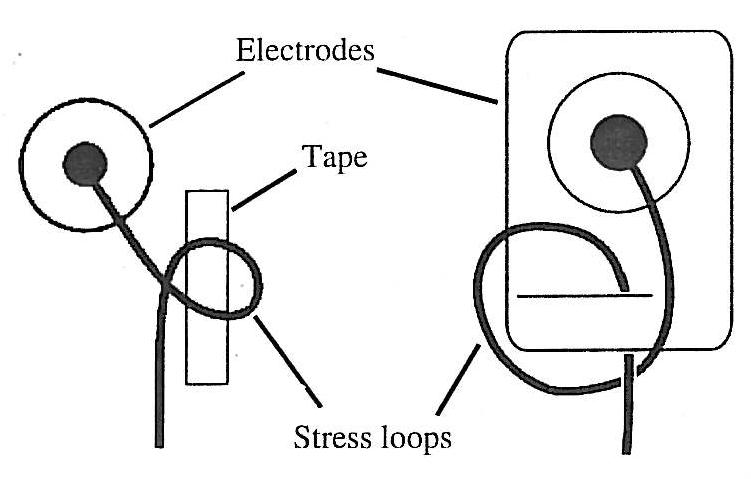
Form a stress loop with each electrode lead, refer to the diagram below.
Tape the loop to the skin. Leave enough slack between the electrode and the stress loop.

Screw patient lead wires onto Holter recorder. Verify that the patient lead wires are connected securely to the recorder.
Write the patient's name and recorder serial number on the Compact Flash Card, or use other identifying measures.
Insert Compact Flash Card into the recorder.
Install brand new batteries. The recorder should beep once and the LCD display will activate.
Press the event button to cycle through channels 1, 2, and 3 of the live ECG tracings on the LCD screen. Verify ECG amplitude, shape, and clarity on all channels. If the live ECG does not show satisfactory ECG waveforms, reposition electrode sites using brand new electrodes and the techniques described above.
Instruct the patient to stand, sit, and lie while verifying the live ECG tracings. Instruct patient to walk in place. Verify no artifact or muscle noise is displayed on the recorder LCD screen. Otherwise, check Stress Loops and re-prep hookup sites with brand new electrodes.
Place recorder into pouch and secure on patient.
Write the patient's name, ID number, test date, test time, and recorder serial number into the patient diary.
Using the event button and the patient diary.
Keeping the recorder and electrodes dry.
Not to open the recorder.
Avoid touching the electrodes or lead wires.